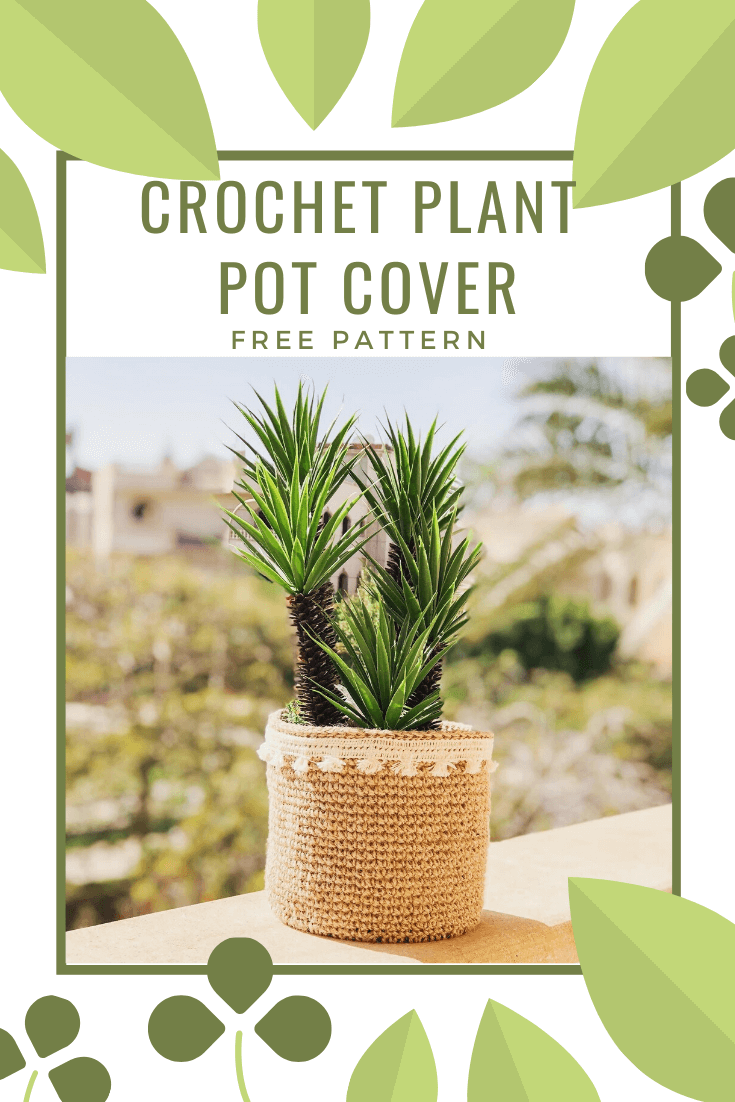
I am so excited to share with you this crochet plant pot cover pattern!
Its a super begginner friendly simple pattern that any one who know how to make single crochet can do. Although I used this as a plant pot cover there are lots of other options you can use it for. You can make a set of decorative nesting baskets using a wooden base set like this one for example! you can also work less or more rounds to decrease or increase its height. If you want you can just make your own base using a basic single crochet circle and control your base size as you wish. However if you want to use a wooden base I have linked some options for you bellow. Finally I used an artificial plant. But am planning to use a real one so if you want a real plant too you should get a pot with its saucer.
This pattern is part of bigger project that I have been preparing for a while. I am doing a room makeover on a budget using mainly crochet and some other DIYs!! I’am a big believer that our surrounding space affect our mood and productivity levels and I find my self more productive and happy when I have a place that is organized and looks pretty.
Also my room is the space where I work on my blog, sit down and chill, study, and even workout!! so basically If I don’t have a pilates class to teach or a family commitment I’ll be in my room (coz am an extremely introverted human being and I like it) :D. Hence I always want to add new things to my room, make it prettier and more functional that’s why I have created this room makeover series!!
Through out this series you will find cute decorative items as well as some functional/ storage solution items too. So If you are interested to see the rest of the series sign up here and receive all the updates, the free patterns and tutorials as well as the reveal of the before and after!!
Check the other patterns in this series that I have already released:
- Crochet boho Baskets
- Cozy crochet cushion
- DIY Vision board
- “Enjoy little things” wall hanging
- Wall pocket / wall organizer
- DREAM dream catcher
- Boho ceiling lmapshade
- Bedside Table Lampshade Free Pattern & Photo Tutorial
- Round Velvet Crochet Pillow Case
- Rise and shine wall hanging
- Bobble-licious Crochet Pillow Case Free Pattern
- DIY Waste Basket / Trash Can – Photo Tutorial
- Sunshine Crochet Pillow Case – Free Pattern.
AND STAY TUNED FOR MORE!!
The materials you will need for this planter/ basket pattern are:
Disclaimer: This blog post may contain affiliate links. I may earn a small commission to fund my coffee drinking habit if you use these links to make a purchase. You will not be charged extra, and you’ll keep me supplied in caffeine. It’s a win for everyone, really.
- Yarn: 1 roll of natural twine yarn (however this can change if you want to make a bigger or smaller size )
I bought mine from my local crafts store. However, I Linked a few options that are very similar to the one I used KINGLAKE 300 Feet Natural Jute Twine , Katzco Heavy Duty All Natural Jute Twine, TIAMALL 300 Feet Natural Jute Twine, Natural Jute Twine 2 Pack - Hook: 3.5 mm, Stitch markers, Scissors, Measuring tape. Here is a set with one of my favorite hooks sets along with stitch markers and needles
- A Glue gun
- Roughly 55 CM lace trims of your choice. Again mine was from my local store. But I linked you very similar ones that I think would go great with the pattern (keep in mind if you are making a bigger basket you will need more)
- Hongma Cotton Fringe Tassel Lace Trim
- Susuntas 5 Yards 4cm Wide Cotton Lace Trim
- 5 Yards 100% Cotton Tassel Trim
5 Yards 100% Cotton Tassel Trim, - Dyeable Cotton Knotted Tassel Trim
- Cotton Fringe Trims, 53/64in Wide
- Here are some colorful ones that i think would look so cute too! Multi-colored tassel fringe trim, and Tassel trim, tassel net fringes.
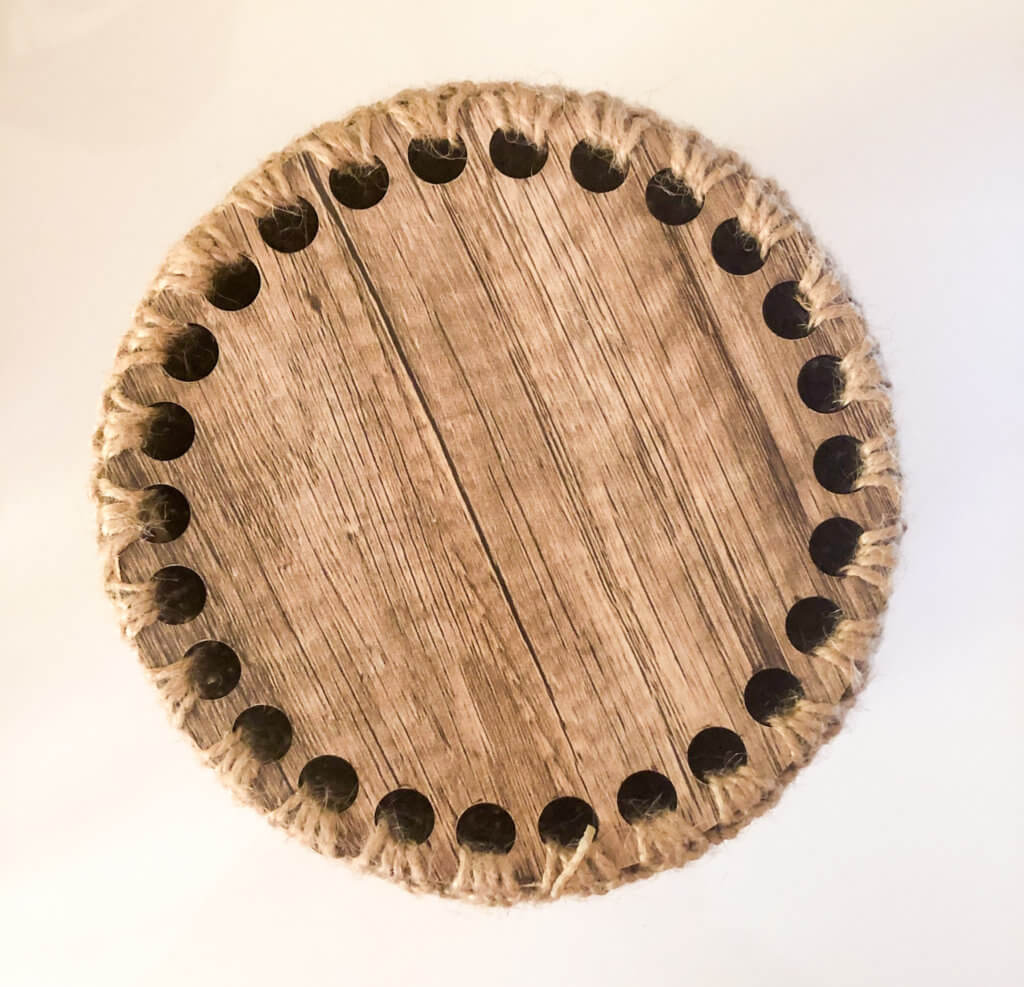
- Basket wood base Mine is 16 cm
Wooden Crochet Bases / Bottoms – Circle – Round – 2 inch to 6 inch – Custom Engraved
Round SETS/LOT of 17cm/6,7in bottoms for crochet basket
Round SETS/LOT x15cm/5,90in bottoms for crochet basket, Crochet basket bottoms
Here is a full nesting set too and another option here too
And those heart shaped are so cute too !!
Sizes:
The diameter of the basket base is 16 cm and the height is 15 cm
Guage:
You don’t need gauge for this project.
Skill level: Beginner
Abbreviations and Glossary (US Terms):
- ch – chain
- sc – single crochet
- ss -slip stitch
Notes:
- The pattern is written in us terms,
- You need to put a stitch marker at the last stitch of each round to mark the end of the round. since we will be working with continuous rounds with no slip stitch at the end of each round
- I used a glue gun to attach the lace trim but you can sew it if you want.
- Although I used this as a plant pot cover there are lots of other options you can use it for. you can make a set of decorative nesting baskets using a wooden base set like this one for example! you can also work less or more rounds to decrease or increase its height.
- Also I used a wooden basket base but if you want you can just make your own base using a basic single crochet circle and control your base size as you wish.
- Finally I used an artificial plant. but am planning to use a real one so if you want a real plant to you should get a pot with its saucer.
PIN IT FOR LATER:

Instructions:
Attach the yarn on any of the holes.
Round 1. 2 sc in each hole (Here is a video to show you how to crochet in the holes but keep in mind we will be making 2sc in each hole)
Put a stitch marker at the last stitch and directly work in the first stitch you made without slip stitching.
Round 2. 1 sc in each sc from the previous round.
Round 3. *1 sc in the next stitch, 2sc in the next one* repeat form * to * till the end of the
Round 4-24. Sc in each stitch around
Round 25. Slip stitch in each stitch around
Cut yarn and weave in ends
With a glue hot glue your last trim just one row below the upper edge of the basket.
I hope you liked this pattern. If you made one, share it with me on Instagram. I would love to see how you adapted it and what variations you made 🙂
Take care and happy crocheting.
As I said at the beginning the post, This pattern is a part of a room makeover using mainly crochet and some other DIYs. If you are interested to see the rest of the series sign up here and receive all the updates, the free patterns and tutorials as well as the big reveal of the before and after!!