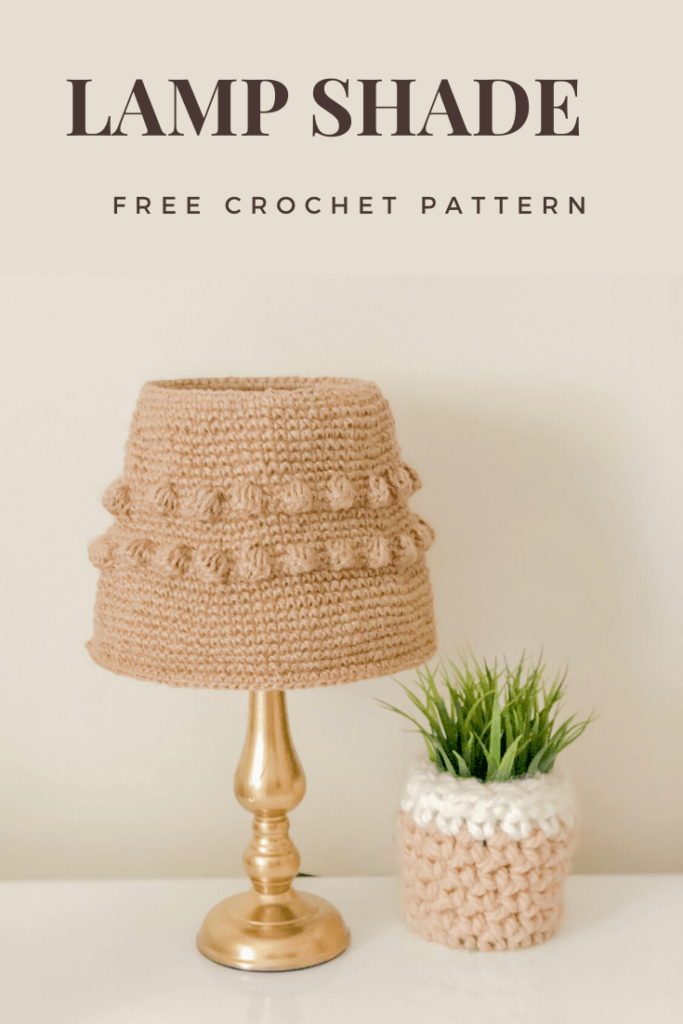
I am so excited to share with you this crochet lampshade pattern!
This pattern is part of bigger project that I have been preparing for a while but I Finally decided to share it with you!!
I am doing a room makeover on a budget using mainly crochet and some other DIYs!! I’am a big believer that our surrounding space affect our mood and productivity levels and I find my self more productive and happy when I have a place that is organized and looks pretty.
Also my room is the space where I work on my blog, sit down and chill, study, and even workout!! so basically If I don’t have a pilates class to teach or a family commitment I’ll be in my room (coz am an extremely introverted human being and I like it) :D. Hence I always want to add new things to my room, make it prettier and more functional that’s why I have created this room makeover series!!
Through out this series you will find cute decorative items as well as some functional/ storage solution items too. So If you are interested to see the rest of the series sign up here and receive all the updates, the free patterns and tutorials as well as the reveal of the before and after!!
If you didn’t see the matching boho ceiling lamp shade pattern check it here and check the two other patterns in this series that I have already released:
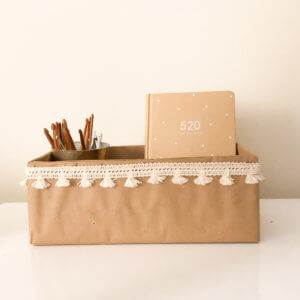
- Crochet boho Baskets
- Cozy crochet cushion
- DIY Vision board
- “Enjoy little things” wall hanging
- Wall pocket / wall organizer
- DREAM dream catcher
- Boho ceiling lampshade
- Rise and shine wall hanging
- Round Velvet Crochet Pillow Case
- Crochet Plant Pot Cover / Decorative Basket
- Bobble-licious Crochet Pillow Case Free Pattern
- DIY Waste Basket / Trash Can – Photo Tutorial
- Sunshine Crochet Pillow Case – Free Pattern.
AND STAY TUNED FOR MORE!!
Pin it for later
Now let’s move directly to the pattern!
Disclaimer: This blog post may contain affiliate links. I may earn a small commission to fund my coffee drinking habit if you use these links to make a purchase. You will not be charged extra, and you’ll keep me supplied in caffeine. It’s a win for everyone, really.
The material you will need for this pattern are:
- Yarn: 1-2 rolls of natural twine yarn (according to the size of you lampshade, mine took 1.5 and its size was 15cm for the upper ring diameter and 24 for the lower ring diameter)
I bought mine from my local crafts store. However, I Linked a few options that are very similar to the one I used KINGLAKE 300 Feet Natural Jute Twine , Katzco Heavy Duty All Natural Jute Twine, TIAMALL 300 Feet Natural Jute Twine, Natural Jute Twine 2 Pack
- Hook: 2.5 mm, Stitch markers, yarn needle . Here is a set with one of my favorite hooks sets along with stitch markers and needles
- If you don’t already have a lamp that you are making over. You might also need a basic lamp shade like this, this, this, or this. And if your like the gold of my lampshade. You can use a Rust-Oleum metallic gold spray paint and spray paint it as I did.
- Finaly if you have the base of a lamp shade but you need the upper part only you can get it here or here. And although my lamp shade has its top narrower than its bottom I think it will look better if they were equal let me know what do you think in the comments section below?
Guage:
You don’t need gauge for this pattern
Skill level: Beginner
Abbreviations and Glossary (US Terms):
- ch – chain
- sc – single crochet
- ss- slip stitch
- bo – bobble stitch
Special Stitches:
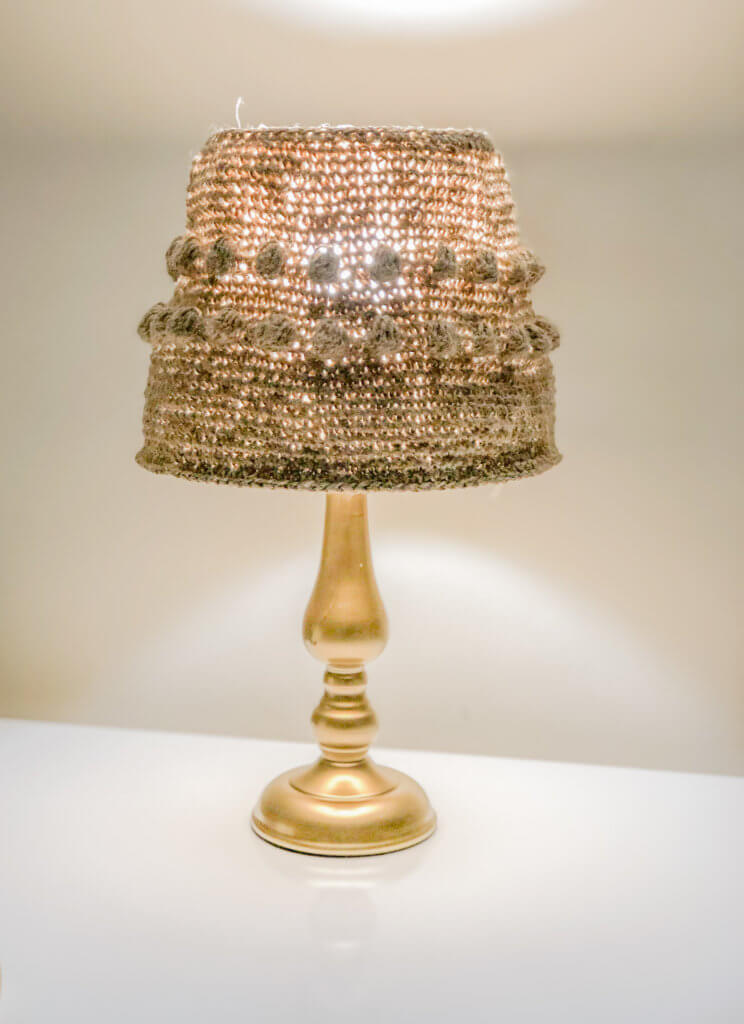
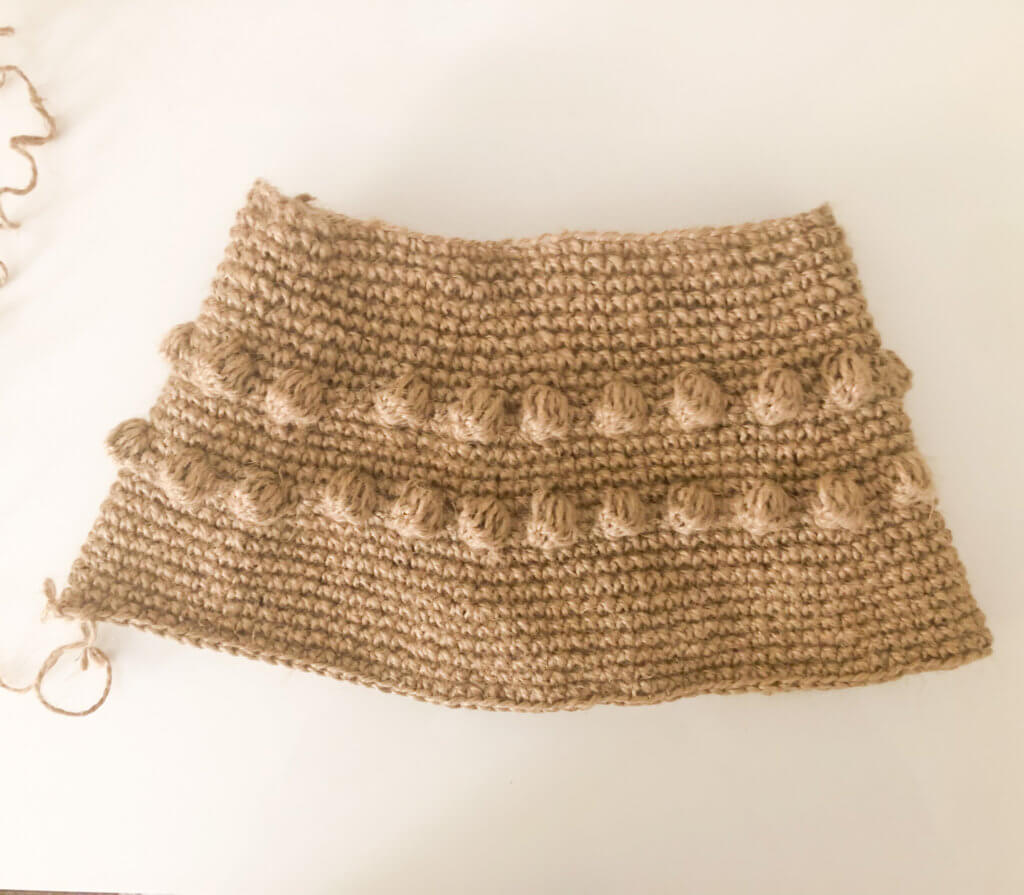
Bobble stitch:
Yarn over, insert hook into the next stitch and pull up a loop. Yarn over, pull through two loops. as if you are doing the first part of a double crochet (DC) (2 loops on the hook);
repeat it until you have 5 HDC on your hook and 1 initial loop (total 6 loops on the hook);
yarn over and pull through all 6 loops (1 loop on the hook – pull pretty tight, so your bobble really pops up); and sc in the next stitch.
Notes:
- The pattern is written in us terms.
- You need to put a stitch marker at the last stitch of each round to mark the end of the round.
- YOU SHOULD ALSO USE AN LED LAMP TO AVOID OVERHEATING!!! AN DON’T LEAVE IT FOR PROLONGED DURATION UNATTENDED
- Although I made this with lampshade that have unequal top and bottom diameter, I think it would look even better with one that have equal bottom and upper diameters.Thats why I included directions for both ways. So if you made one let me see it!!
- It’s a good idea to try it on the lampshade every while to make sure it fits perfectly especially if you are increasing.
Instructions:
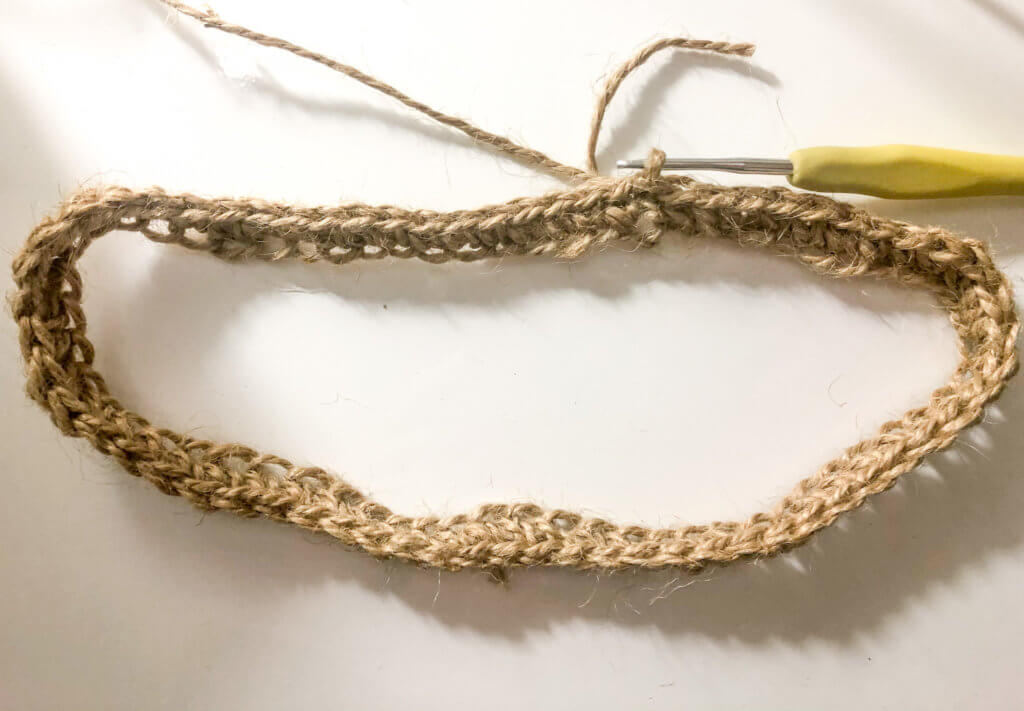
Chain 65 or as manny stitches to fit you ring diameter
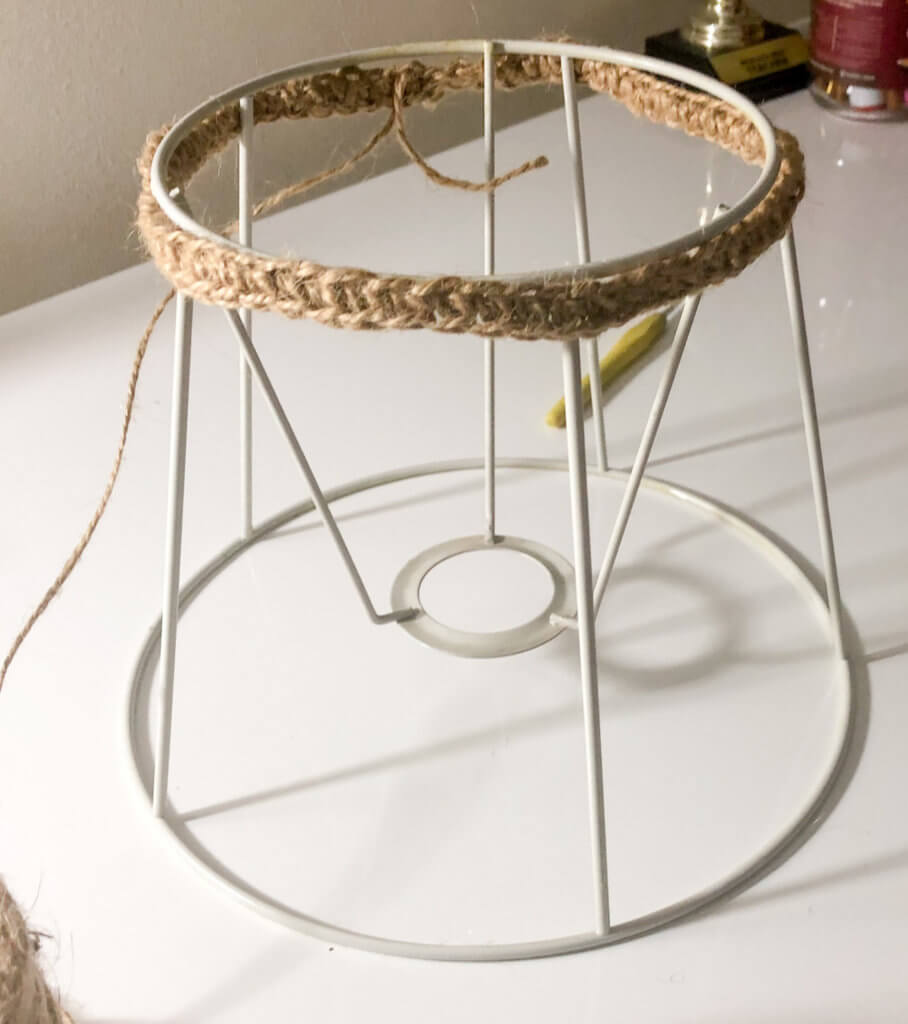
Slip stitch to the first chain so that you have a ring with the same diameter as your top metal ring.
Round 1. Sc in each chain around. Put a stitch marker in the last stitch (AS YOU GO UP EVERY ROUND PUT THIS STITCH MARKER IN EACH LAST STITCH)
Now place your ring on the lampshade to make sure it fits perfectly:
After making sure it fits perfectly work
Round 2: sc in each stitch around

Note that if you have a drum lampshade with equal upper and lower ring diameters you will continue to work without increasing and follow the same pattern. However, If you need to increase Follow the directions bellow.
Now I used the metal dividers I have on my lampshade to mark where I should Increase, and I put stitch markers in each stitch that is in front of a metal divider. however if you don’t have them you just have to divide your stitches into 5 equal parts and put your stitch markers at the end of each part. Notice you will have the stitch marker at the end of the round so now you will have 6 stitch markers.
Round 3. Sc in each stitch, increase (2sc) in the marked stitches
Round 4. Sc in each stitch around
Round 5. Sc in each stitch around
Round 6. Sc in each stitch, increase (2sc) in the marked stitches
Round 7. Sc in each stitch around
Round 8. Sc in each stitch around
Round 9. Sc in each stitch, increase (2sc) in the marked stitches
Round 10. Sc in each stitch around
Round 11. Sc in each stitch around
Round 12. Sc in each stitch, increase (2sc) in the marked stitches
Round 13. Chain one and turn to reverse the direction of the round so that you have the inside of the stitches facing you. *work one bobble stitch in the first stitch (which will be the last stitch from the previous round then place the stitch marker again in this stitch) sc in the next 3 stitches, *bobble stitch in the next stitch, sc in the next three stitches* repeat from * to * till the end of the round. slip stitch in the first bobble stitch you previously made. (if you have an extra stitch at the end of the round not exactly 3 be forgiving 😀 if you have 2 or 4 it will look as good too it won’t be even noticed)
Round 14. Chain one and turn to reverse the direction of the round again so that the right side of the stitches is facing and work sc in each stitch around
Round 15. Sc in each stitch, increase (2sc) in the marked stitches
Round 16. Sc in each stitch around
Round 17. Sc in each stitch around
Round 18. Sc in each stitch, increase (2sc) in the marked stitches
Round 19. Chain one and turn to reverse the direction of the round so that you have the inside of the stitches facing you. *work one bobble stitch in the first stitch (which will be the last stitch from the previous round then place the stitch marker again in this stitch) sc in the next 3 stitches, *bobble stitch in the next stitch, sc in the next three stitches* repeat from * to * till the end of the round. slip stitch in the first bobble stitch you previously made. (if you have an extra stitch at the end of the round not exactly 3 be forgiving 😀 if you have 2 or 4 it will look as good too it won’t be even noticed)
Round 20. Chain one and turn to reverse the direction of the round again so that the right side of the stitches is facing and work sc in each stitch around
Round 21. Sc in each stitch, increase (2sc) in the marked stitches
Round 22. Sc in each stitch around
Round 23. Sc in each stitch around
Round 24. Sc in each stitch, increase (2sc) in the marked stitches (you may skip the increase here if you feel the lamp is wide enough)
Round 25. Sc in each stitch around
Round 26. Sc in each stitch around
Your last step will be attaching it to you lamp shade
If you have a metal body like the one i have you can follow the video bellow to attach it.
If you have a drum lampshade like this one you can just hot glue it to the base at the top and bottom with a glue gun
I hope you liked this pattern. If you made one, share it with me on Instagram. I would love to see how you adapted it and what variations you made 🙂
Take care and happy crocheting.
As I said at the beginning the post, This pattern is a part of a room makeover using mainly crochet and some other DIYs. If you are interested to see the rest of the series sign up here and receive all the updates, the free patterns and tutorials as well as the big reveal of the before and after!!