

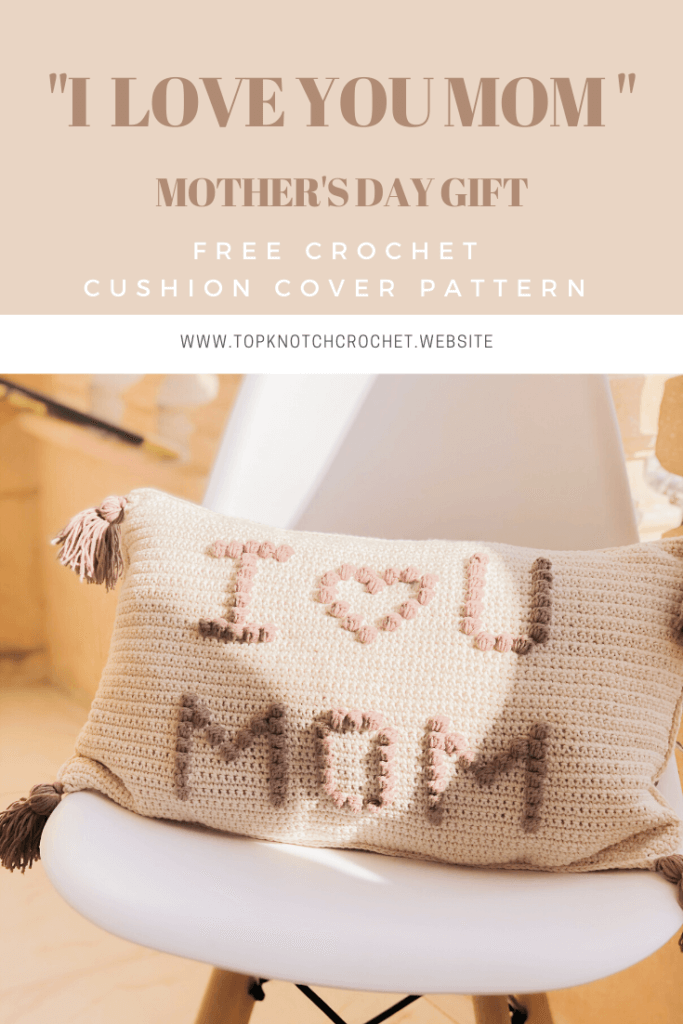
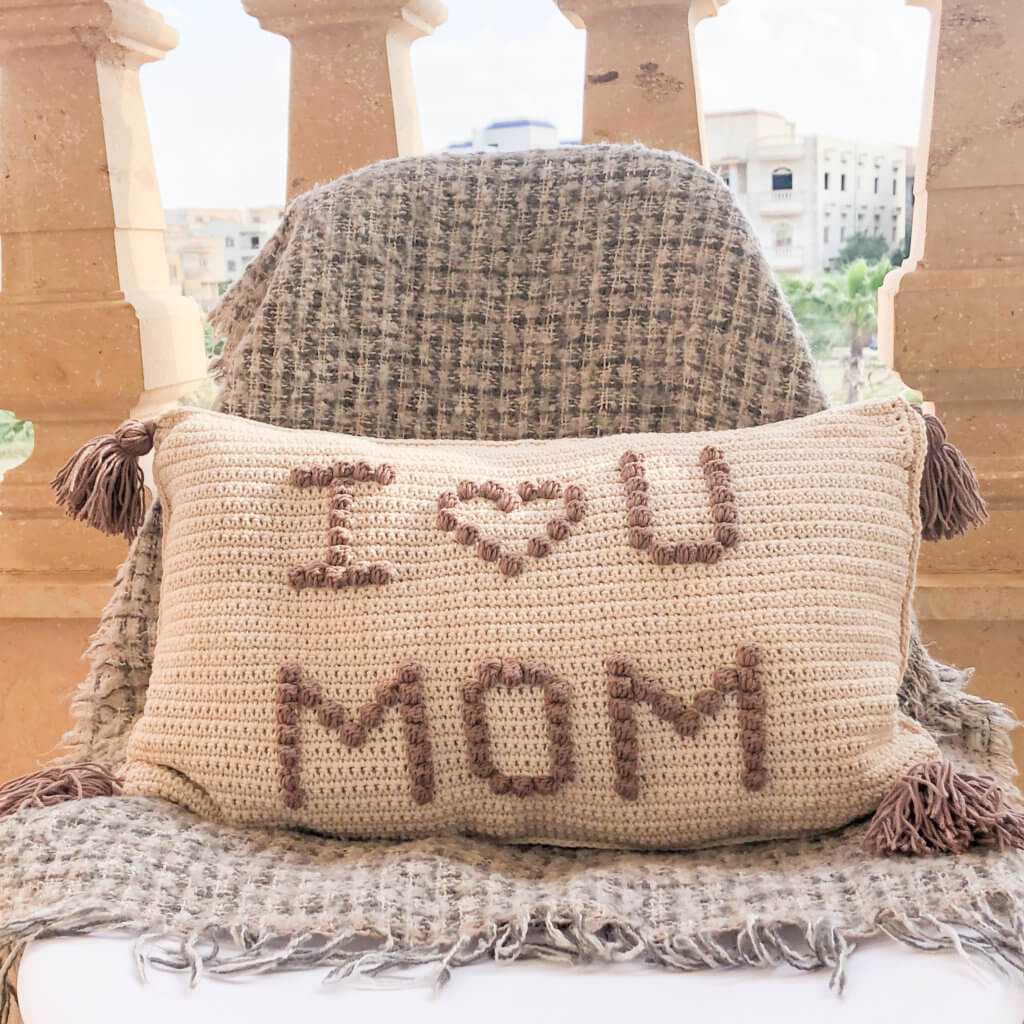
Hello guys! today is Mother’s Day in Egypt. But I know that lots of other countries celebrate it in May. So if you are looking for a Mother’s Day Crochet Gift. This pattern may be the one! It’s a beginner-friendly simple pattern. Yet it will make a very special gift.
Pin it for later!!
Now let’s take you directly to the pattern
The materials you will need for this crochet Pillowcase are:
Disclaimer: This blog post may contain affiliate links. I may earn a small commission to fund my coffee drinking habit if you use these links to make a purchase. You will not be charged extra, and you’ll keep me supplied in caffeine. It’s a win for everyone, really.
- Two skeins of Alize cotton gold (Code 67) candlelight and one skein of your accent color I also used Alize cotton gold milky brown (code 688)
- Or any sport weight (2) cotton acrylic blend yarn of your choice.
- 3.5 mm hook, Stitch markers, Scissors, Measuring tape. Here is a set with one of my favorite hooks sets along with stitch markers and needles
- A 12″ x 18″ [30 cm x 45 cm] Pillow Insert Or Follow this tutorial and make it yourself!!
MEASUREMENTS
Approx 12″ x 18″ [30 cm x 45 cm].
GAUGE:
20 sc and 20 rows = 4″ [10 cm].
Skill level: Beginner
Abbreviations and Glossary (US Terms):
ch – chain
sc – single crochet
bo- bobble stitch
Special Stitches and Techniques:
Bobble stitch: Watch this tutorial for the method I used to change colors with the bobble stitches
Yarn over, insert hook into the next stitch and pull up a loop. Yarn over, pull through two loops. as if you are doing the first part of a double crochet (DC) (2 loops on the hook);
repeat it until you have 5 HDC on your hook and 1 initial loop (total 6 loops on the hook);
yarn over and pull through all 6 loops (1 loop on the hook – pull pretty tight, so your bobble really pops up); and sc in the next stitch.
Notes:
- The pattern is written in US terms.
- The pattern starts from the bottom and ends at the top
- You will work all stitches in beige except the bobble stitches.
- You may want to make the pillowcase 0.5 inches smaller than the actual pillow insert. To make sure that your pillowcase fits perfectly without any loose areas, pumps or gaps.
- You can adjust the dimensions of the pillow by adding or subtracting rows up and down and/or between the two words. Or chains form right and left.
- Your stitch count throughout the whole pattern will be 85 stitches (You may watch this tutorial and apply it throughout the pattern to help you achieve straight edges
- For the rows that do not have bobbles you can either work the entire row over your accent color (brown in my case) yarn so that you can pick it up the next row. or you can cut the yarn by the end of each bobble row and reattach it at the start of the next bobble row.
Instructions:
Front:
Chain 86 with beige yarn
Row 1-10. Sc in each stitch in the row (85 Stitches)
Watch this tutorial for the method I used to change colors with the bobble stitches
Row 11. 20 sc, 1 bo, 11 sc, 1 bo, 7 sc, (1 bo, 1 sc) 3 times, 6 sc, 1 bo, 11 sc, 1bo, 20 sc.
Now you can either work the entire row over the brown yarn so that you can pick it up the next row. Or you can cut the yarn by the end of this row and reattach it again at the start of the next bobble row.
Row 12. sc (with your base color) in each stitch in the row.
Row 13. 20 sc, 1 bo, 11 sc, 1 bo, 5 sc, 1 bo, 7 sc, 1 bo, 5 sc, 1 bo, 11 sc,1 bo, 20 sc.
Row 14. sc in each stitch in the row.
Row 15. 20 sc, 1 bo, 11 sc, 1 bo, 5 sc, 1 bo, 7 sc, 1 bo, 5 sc, 1 bo, 11 sc,1 bo, 20 sc.
Row 16. sc in each stitch in the row.
Row 17. 20 sc, 1 bo, 5 sc, 1 bo, 5 sc, 1 bo, 5 sc, 1 bo, 7 sc, 1 bo, 5 sc, 1 bo, 5 sc, 1 bo, 5 sc, 1 bo 20 sc.
Row 18. sc in each stitch in the row.
Row 19. 20 sc, 1 bo, 3 sc, 1 bo, 3 sc, 1 bo, 3 sc, 1 bo, 5 sc 1 bo, 7 sc, 1 bo, 5 sc, 1 bo, 3 sc, 1 bo, 3 sc, 1 bo, 3 sc, 1 bo, 20 sc.
Row 20. sc in each stitch in the row.
Row 21. 20 sc, 1 bo, 1 sc, 1 bo, 7 sc, 1 bo, 1 sc, 1 bo, 5 sc, 1 bo, 7 sc, 1 bo, 5 sc, 1 bo, 1 sc, 1 bo, 7 sc, 1 bo, 1 sc, 1 bo, 20 sc.
Row 22. sc in each stitch in the row.
Row 23. 20 sc, 1 bo, 11 sc, 1 bo, 7 sc, (1 bo, 1 sc) 3 times, 6 sc, 1 bo, 11 sc, 20 sc.
Row 24-34. Sc in each stitch in the row
Row 35. 20 sc, (1 bo, 1sc) 5 times, 12 sc, 1 bo, 15 sc, (1 bo, 1sc) 3 times, 21 sc.
Row 36. sc in each stitch in the row.
Row 37. 24 sc, 1 bo, 15 sc, 1 bo, 3 sc, 1 bo, 11 sc, 1 bo, 7 sc,1 bo, 20 sc.
Row 38. sc in each stitch in the row.
Row 39. 24 sc, 1 bo, 13 sc,1 bo, 7 sc, 1 bo, 9 sc, 1 bo, 7 sc,1 bo, 20 sc.
Row 40. sc in each stitch in the row.
Row 41. 24 sc, 1 bo, 11 sc,1 bo, 11 sc, 1 bo, 5 sc, 1 bo, 7 sc,1 bo, 20 sc.
Row 42. sc in each stitch in the row.
Row 43. 24 sc, 1 bo, 11 sc, 1 bo, 5 sc,1 bo, 5 sc, 1 bo, 5 sc, 1 bo, 7 sc, 1 bo, 20 sc.
Row 44. sc in each stitch in the row.
Row 45. 24 sc, 1 bo, 13 sc, 1 bo, 1sc, 1 bo, 3 sc, 1 bo, 1 sc , 1 bo, 9 sc, 1 bo, 7 sc,1 bo, 20 sc.
Row 46. sc in each stitch in the row.
Row 47. 20 sc, (1 bo, 1sc) 5 times, 26 sc, 1 bo, 7 sc, 1 bo, 20 sc.
Row 48-57. Sc in each stitch in the row
Back:
Chain 86 with creme yarn
Row 1-56. sc in each stitch in the row (80 Stitches)
Finishing Touches
- Work one last row of sc around the 2 short edges of the two pieces of the pillowcase
- Single crochet both pieces together around three edges, insert your pillow and continue with the forth side
See the method I used to single crochet the two pieces together in the video bellow.
Tassels
Finally to make the tassels I used the tutorial in the pictures bellow. Click on the picture to go to a more detailed tutorial.
To attach it to the scarf you are just going to leave a long tail at the top of the tassel tie it tightly to the bottom corners of the pockets/scarf and weave in ends.
Here is another video tutorial for how to make tassels and attach them
Check the other home decor patterns:
- “Enjoy little things” wall hanging
- Wall pocket / wall organizer
- Bobble-licious Crochet Pillow Case Free Pattern
- Crochet boho Baskets
- Cozy crochet cushion
- DIY Vision board
- Wall pocket / wall organizer
- DREAM dream catcher
- Boho ceiling lmapshade
- Bedside Table Lampshade Free Pattern & Photo Tutorial
- Round Velvet Crochet Pillow Case
- Crochet Plant Pot Cover / Decorative Basket
- Rise and shine wall hanging
- DIY Waste Basket / Trash Can – Photo Tutorial
- Sunshine Crochet Pillow Case – Free Pattern.
I hope you liked this crochet pattern. If you made one, share it with me on Instagram. I would love to see how you adapted it and what variations and colors you used 🙂
Take care, stay safe, happy mother’s day and happy crocheting!!
My brother suggested I might like this website. He was totally right.
This post truly made my day. You cann’t imagine just how much time I had
spent for this info! Thanks!
oh this made my day thank you so much !!
The pattern is pretty. Looks like there is a mistake in row 11 where there should have been 1 bo after 11 sc . Had to frog out my work and redo 🙁
thank you so much for updating me I have just corrected it, and am so so sorry that you had to frog your work and redo it
Hi so I’m wondering if you have another pattern that says dad instead of mom as I want to make these for both my parents, thanks! lovely pattern <3